PR065 » A getting started tutorial on FPGA implement of CNN using OpenCL
More and more applications like objective detection, objective tracking and facial recognition appear on embedded systems and mobile applications. Convolution neural network (CNN) is the key algorithm to these applications. However, CNNs are computationally and memory intensive which leads to long runtime and high power consumption, making them nearly impossible to deploy. We are working on a CNN software architecture suitable to these applications based on Cyclone V SoC-FPGA hardware platform, which are designed to contain 3 parts:
(1) Compressed and pruned CNN model with less computation and power consumption
(2) CNN accelerator on FPGA based on OpenCL
(3) Matching software and APIs
Purpose of the design
Recent years, more and more applications like objective detection, objective tracking and facial recognition appear on embedded systems and mobile applications. Typically, these applications require low latency and are limited by power consumption. Convolutional neural network (CNN) is the key algorithm to these applications. However, CNNs are computationally and memory intensive which leads to long runtime and high power consumption, making them difficult to deploy on systems with limited hardware resources and power budgets. We are working on a solution to deploy deep CNNs in condition like this, which use an optimized software architecture on a Cyclone V SoC-FPGA hardware platform. The software architecture is designed to contain 3 parts as listed below.
1. Compressed and pruned CNN model with less computation and power consumption
State-of-the-art deep CNN models have hundreds of millions of connections, causing computationally and memory intensive.
The runtime during the forward propagation of a CNN model is dominated by convolutional layers. With the goal of speeding up inference, Molchanov et al. (2016)[1] propose an approach to prune entire feature maps. This approach interleaves greedy criteria-based pruning with fine-tuning by backpropagation. The procedure is computationally efficient and maintains good generalization in the pruned network. Most pruned networks get at least 2x speed-up.
As for memory intensive, Han et al. (2015)[2] introduce an approach named “Deep Compression” for intra-kernel pruning. “Deep Compression” is a three stage pipeline of pruning, trained quantization and Huffman coding. On ImageNet dataset, “Deep Compression” successfully compresses AlexNet by 35x, from 240MB to 6.9MB, and VGG-16 by 49x, from 552MB to 11.3MB, with no loss of accuracy, so that the model can fit into on-chip SRAM cache rather than off-chip DRAM memory for better energy efficiency.
We plan to try both approaches to get higher performance and energy efficiency, so that the CNN model can be deployed on embedded systems and mobile applications.
2. CNN accelerator on FPGA based on OpenCL
Conventional embedded processors consume large amount of energy and are not suitable for parallel computing. On the other hand, embedded GPUs are good at computationally intensive tasks but are not energy efficient. The structure of FPGAs allows them to offer a trade-off among the platforms with high performance and energy efficiency. The CNN accelerator can improve parallel computing performance by offloading a CPU from computationally intensive tasks to an FPGA. SoC-FPGA platforms integrate both processor and FPGA on a single chip.
In contrast to conventional CPU-FPGA platforms, SoC-FPGA platforms have higher communication bandwidth between processor and FPGA, and they could be own better performance and less power consumption
There are already some open source OpenCL based CNN accelerators, we plan to design our CNN accelerator according to them. Then, optimize it for our compressed and pruned CNN model by implementing techniques like sparse matrix multiplication.
3. Matching software and APIs
The procedure to prune, compress and fine-tune custom CNN models are really complex that they may take weeks to accomplish even on high-performance GPUs. So this part of code will be implemented on PC using a popular deep learning library. The code on DE10-NANO will complete the forward propagation on the pruned and compressed model, so that users can deploy a high-performance and energy efficient CNN on DE10-NANO.
Application scope and targeted user
Embedded systems and mobile applications which need to deploy CNN algorithm, like self-driving cars or drones.
Reference
[1] Molchanov, P., Tyree, S., Karras, T., Aila, T., & Kautz, J. (2016). Pruning convolutional neural networks for resource efficient inference.
[2] Han, S., Mao, H., & Dally, W. J. (2015). Deep compression: compressing deep neural networks with pruning, trained quantization and huffman coding. Fiber, 56(4), 3--7.
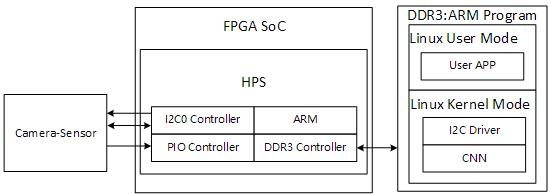
(a) FPGA SoC and HPS System Block
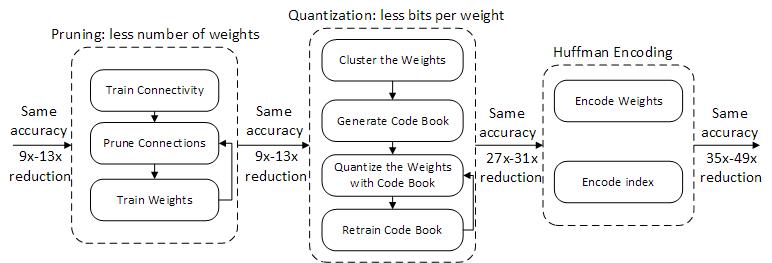 (b) Pruning Quantization and Huffman coding
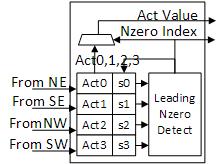
(c) The architecture of Leading Non-zero Detection Node
 (d) The architecture of Processing Element
The final work of this project will contain serval parts as listed below:
1. Compressed and pruned CNN model with less computation and power consumption
2. CNN accelerator on FPGA based on OpenCL
(3) Code to forward propagate the CNN model using camera as input on DE10_NANO
Since this is a not an easy task and time is limited, we may not finish all of them on time, but we’ll try our best.
Also, we’ll compare our result with the state-of-the-art studies. First, we’ll compare our compressed and pruned CNN model with its origin model to get a desired balance between accuracy loss and compression rate. Second, we’ll test our CNN model on different hardware platform to show the performance and energy efficiency of our FPGA accelerator. For an example, we’ll test the M x V throughput (frames/s) and energy efficiency (frames/J) on DE10-NANO with and without the FPGA accelerator. And according to Han et al.(2016)[3], their ASIC DNNs hardware platform EIE gets 81967 frames/s on M x V throughput and 138927 frames/J on energy efficiency. Embedded GPU Tegra K1 gets 173 frames/s on M x V throughput and 33.9 frames/J on energy efficiency. We hope to get our result somewhere between EIE and Tegra K1.
Reference
[3] Han, S., Liu, X., Mao, H., Pu, J., Pedram, A., & Horowitz, M. A., et al. (2016). Eie: efficient inference engine on compressed deep neural network. Acm Sigarch Computer Architecture News, 44(3), 243-254.
We were hoping to try pruning and model compression techniques on CNN models so that it could fit on source-limited FPGAs. However, we are just beginners in this area, we barely found any tutorials and suffered a lot from getting started. And so far, we’ve only accomplished relatively naive implement and low-level optimizing techniques. Also, there are many brilliant teams working on the same topic, trying to get optimized FPGA implement of CNN. So, we decided to present our work as a getting started tutorial on FPGA implement of CNN using OpenCL, hoping it could help those who want to set foot on this topic and are having a hard time getting started like us. We’ll later open source all our code.
CNN is one of the most popular algorithms in deep learning recent years. It represents the state-of-art ability in several computer vision tasks, like objective detection, image classification, and image segmentation. CNN has already achieved human level on image classification and even better at some specific tasks.

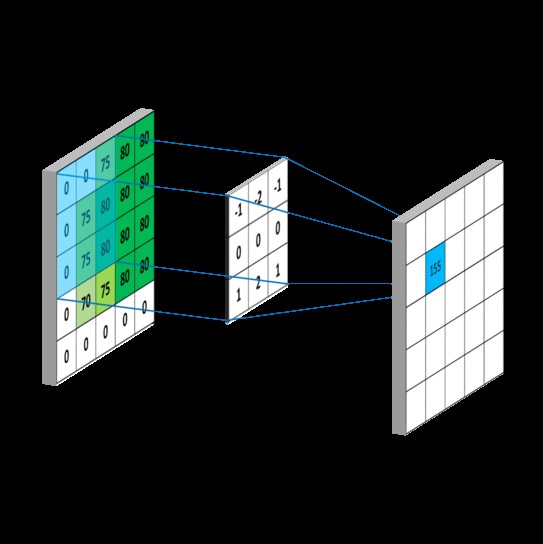
Pic from the syllabus of CS231n, a Stanford open course.
CNN is extremely computationally expensive. Recent deep CNN models require more than 20 GFLOPs per image, which CPU can’t easily process. The common solution is to accelerate the process with powerful GPU for its great capacity of parallel computing. The bottleneck of GPU accelerators is its power consumption, which can be a very crucial factor for cloud servers or embedded systems.
On the other hand, due to its parallel architecture, FPGA is also good at parallel computing, which means it is capable of traditional data parallel and task parallel computing. FPGA can achieve pipeline parallel by generating modified circuit and data path, which outputs a result each clock cycle. Another significant benefit of FPGA is its energy consumption. FPGA can run at the same speed as a GPU but only consumes lower than 10 percent of the power.
So, we believe FPGA can be a very good substitute for GPU when accelerating CNN or other computational expensive tasks where power consumption is a crucial factor to consider.
The OpenCL standard is the first open, royalty-free, unified programming model for accelerating algorithms on heterogeneous systems. OpenCL allows the use of a C-based programming language for developing code across different platforms, such as CPUs, GPUs, and FPGAs. A key benefit of OpenCL is that it is a portable, open, royalty-free standard, which is a key differentiator versus proprietary programming models. And with Intel FPGA SDK for OpenCL, we can fully leverage the unique capabilities of FPGAs to deliver acceleration performance with power efficiency and low latency.
There are several CNN models commonly used in recent years, like AlexNet, VGG,GoogleNet, and ResNet. However, most models are too computationally expensive to deploy on embedding systems. Also, applications on embedding systems often require much low latency, which means deep networks can’t fit on source-limited FPGAs, like the cyclone V FPGA on DE10-nano board. So our task is to find those “efficient” models.
Canziani et al.(2016) make a very impressive comparison among common CNN models. The computation ability of DE10-nano is around 10 GFLOPs, so it can only afford AlexNet-level models. Canziani et al. clearly demonstrates that ENet has about the same operations as AlexNet but with higher accuracy. And according to Paszke et al.(2016), ENet can reach 21 frames per second on Nvidia embedded processor TX1.
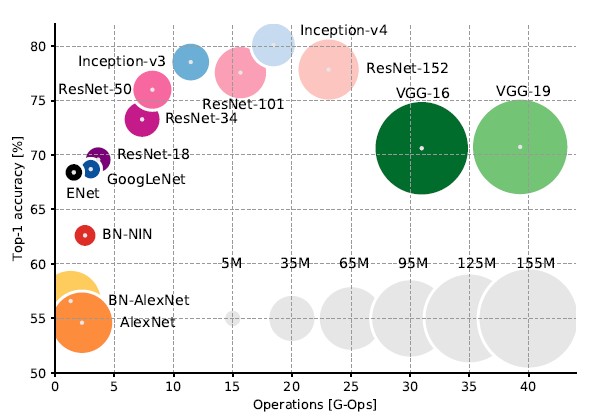
Beside, Iandola et al.(2017) propose small CNN architecture called SqueezeNet. SqueezeNet achieves AlexNet-level accuracy on ImageNet with 50x fewer parameters that are more feasible to deploy on FPGAs and other hardware with limited memory. SqueezeNet v1.1 from this repo has 2.4x less computation than its original version, without sacrificing accuracy.
We believe both ENet and SqueezeNet are great choices to deploy on DE10-nano. Our choice is SqueezeNet v1.1. Because its OpenCL implement is easier and its pre-trained model is supported by several deep learn frameworks.
1. Designing and debugging OpenCL kernel
The CNN model we are using is a pre-trained SqueezeNet v1.1 model build by pytorch. So for the first part, all we need to do is to extract parameters from the pre-trained model. We simply store all the parameters in a ‘.h’ file for the later use.
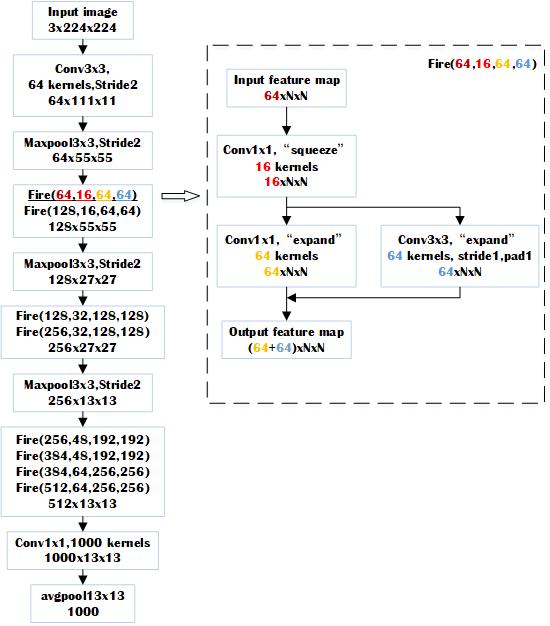
The architecture of SqueezeNet v1.1 is shown in the figure above. Actually, SqueezeNet v1.1 only has 4 types of layer: 3x3 convolutional layer, 1x1 convolutional layer, 3x3 max pool layer and 13x13 average pool layer. So our implement designs one OpenCL kernel for each kind of layer.
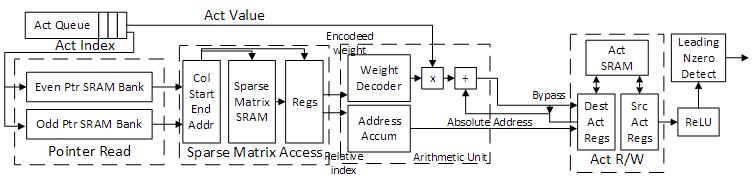
Every element in the output feature map of the 3x3 convolutional layer is the dot produced by a Nx3x3 matrix from the corresponding area of the input feature maps and a Nx3x3 convolution filter weight matrix, where N is the total number of the input feature maps. And the output size can be calculated as output_size = (input_size – 3 + 2 x pad) / stride +1. For each convolution filter, there will be an output_size x output_size feature map.
The idea behind our 3x3 convolution OpenCL kernel is relatively simple. Each kernel calculates only one output feature map.
1.2.2 1x1 convolution OpenCL kernel
1x1 convolution OpenCL kernel is almost the same with 3x3 convolution OpenCL kernel. It just replaces the Nx3x3 corresponding area to Nx1x1. Since there is no padding and stride in 1, calculation of output size is the same as input size.
1.2.3 3x3 maxpool OpenCL kernel
The goal of maxpool layers is to down sample the feature maps to reduce calculation. So for each input feature map, it just picks the largest activation in every 3x3 area and pass it to the output feature map. Each 3x3 maxpool OpenCL kernel calculates only one output feature map.
1.2.4 13x13 average pool OpenCL kernel
SqueezeNet v1.1 uses an average pool layer as a classifier. The input of this layer is a 1000 x 13 x 13 matrix. Since there are 1000 classes in the imagenet dataset, each class score can be compute as the mean of a 13 x 13 feature map. Each of our 13x13 average pool OpenCL kernel computes a single class score.
We highly recommend using python OpenCL host API pyopencl to finish the host program first, then translate to C/C++ to compile on Intel Soc-EDS. Here are our reasons:
Once it is 100 percent sure that the kernel is correct, we can compile the kernel with Intel OpenCL SDK to see whether there are enough resources and then optimize the kernels’ performance.
The host program is modified based on Terasic’s OpenCL vector add example in the DE10-nano OpenCL BSP and basically a translation from the pyopencl version described in the last chapter. So, if you are familiar with OpenCL, this part shouldn’t be too hard.
The Intel OpenCL SDK provides many useful tools to help optimize kernels. Also, there are many advanced techniques like Intel channel extension which can really speed up the kernels. Although well-designed PipeCNN from the other team gets an around 10x speed up than our implement using Intel channel extension. Due to the time limit, we are only able to explore a few low-level optimizing techniques.
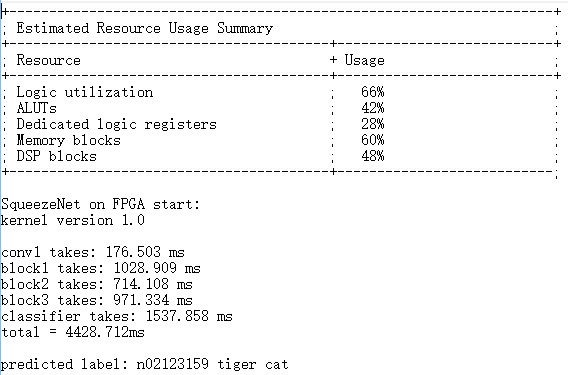
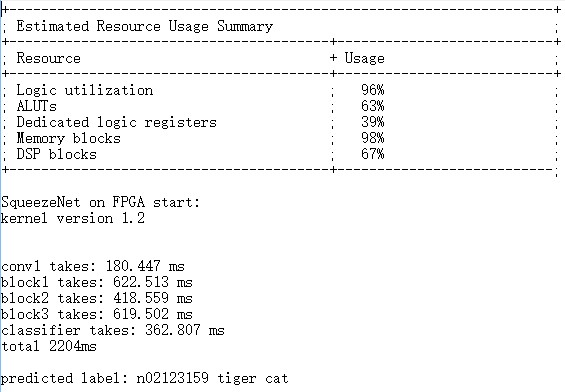
The naive implement described in ch.3 uses 66% present of the FPGA resources. Classification per image takes around 4.5 seconds.
We then tried using SIMD implement for the avgpool kernel instead of NDrange Kernel. The FPGA resources consumed slightly drop but the runtime increases.
After several attempts, the final version of our implementation we use #pragma unroll to parallel the inner loop in the conv1x1 kernel for it is most frequently used. Additionally, we use –fp-relaxed flag while compiling. According to Intel, this flag enables the addition to be computed more efficiently in hardware, using a tree structure instead of a vine. This version gets a 2x boost than the naive version. It consumes 96% percent of the FPGA resources and takes about 2.2 seconds per image to do the classification.
There are many kinds of research about using large-scale FPGA like Arria 10 to completely replace GPU in PC or workstation and accelerate the whole back-forward pass(training) and forward pass process of CNN.
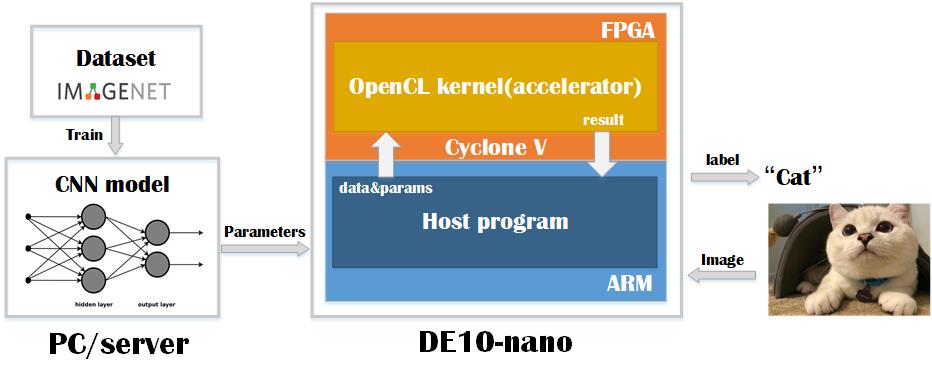
The FPGA presented by the council is a cyclone v on de10-nano board sponsored by Terasic and Intel, which is not powerful enough to accelerate the whole training process. Nowadays, we’ve seen more and more CNN applications on embedded systems like face recognition on cell phones and object detection on drones or robots. So, we focus on accelerating only the forward pass of CNN on embedded systems which resources and power consumption are limited, and Cyclone V FPGA can be a perfect solution — using its arm processor as traditional controller and FPGA as a low power accelerator.
So the whole picture of FPGA implement of CNN using OpenCL is like the figure shown below.
Here is the software flow of FPGA implement of CNN using OpenCL.

Here is our network structure.